Prepare for Ferryman
Even if Lottiefiles does not have any special naming convention for layers, markers, etc. Ferryman does! Meeting the requirements for Ferryman is crucial, so you can actually update data and play different parts of the animation.
Check out our short video tutorials:
If you are preparing your animation in Adobe After Effects to be used with Ferryman for the first time, just follow this page step by step.
Name the layers
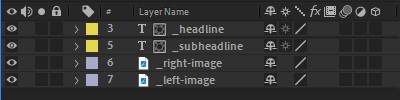
- every Layer needs to have a unique name.
- layers that are meant to be changed (textlayers or images) need to be named with an underscore "_" at the beginning.
_headLine, _subHeadline , _right-image, ...
StreamShapers Ferryman automatically recognizes layers named according to this convention and highlights them. The script only updates texts on text layers and can change images by sending a new image path. If you want to change data for an animation you have to make sure that the data is stored in a text layer, not in a slider. If you don't want to see the text layer, just make it invisible.
Add start and stop markers
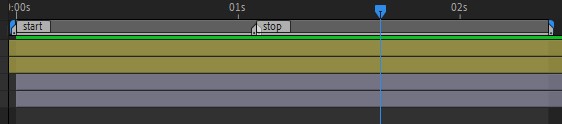
You have to add a start and a stop marker to your animation timeline. They will split the animation into parts, so you can play the parts step by step. Every marker needs to have a duration - After playing the part, the animation will stop on the last frame of the marker. This is how you name them. The "start" marker is 100% necessary:
start //part that should play on "play" Command
The stop marker is optional, if you don't want to sepcify an out animation, you don't have to. But if you want one, use it:
stop //part that shall play on "stop" Command
Your timeline with start and stop markers could look like this:
You may think the template plays from one marker to the next. But its important to understand that it playes just the duration of the marker. If you forget to add a duration, the marker never gets played.
Next markers (optional)
Add next markers to your timeline if you want the animation to stop at certain steps. We recommend placing them between the start and stop markers.
next1 , next2 , next3 , [...] //part that shall play on "next" Command.
These markers will be played between the start and stop animation and need to be named 'next' + an increasing number. Do not leave out a number, keeping your compositions tidy is always a good idea.
Your timeline with next markers could look like this:

Loop markers (optional)
The loop markers enable you to play areas of your timeline in a loop until you trigger 'next'.
You can use these markers if you want to use loops in your animation:
start_loop   // should span a part that keeps on looping after start marker was played

next1_loop   // marks the area of the timeline that shall be played after the next1 area
next2_loop   // marks the area of the timeline that shall be played after the next2 area
next3_loop   // marks the area of the timeline that shall be played after the next3 area
When the template receives the "Next" command while playing a loop, it will play the loop until the end and then play the subsequent marker.
Your timeline with loop markers could look like this:

Update Animation (optional)
If you want to update a graphic while it is already on air, you can use the "Update" command. Normally the graphic would just jump from the old value to the new one. By using an update marker, you can specify the animation that should be played for the update.
To use this feature, create a marker that spans the update animation:
update // marks the are that will be played when the templates receives the update command.
To make the animation possible, you will need a twin of your textlayers for the duration of the update. If your original textlayer is called "_text", this twin will need to be called "_text_update". It will be used only for the update animation. After the update was played, the original textlayer will be the one holding the new value, so that a new update can be performed.
Your timeline with update marker and layers could look like this:

Your update animation could as well be in between start and stop marker. It's up to you where the markers are placed. Keep in mind, that your animation should look the same at the end of 'start' area and the beginning of 'update'. If they don't match, the animation will visualy jump into the update.