Technical Limits
"Once we accept our limits, we go beyond them." - Albert Einstein
After Effects is a very powerfull software that an artist can use to do so many things with. It is traditionally used for motion graphics, visual effects and compositing. As our workflow aims to create real-time graphic templates with it, we need to set some limits for our OGraf workflow. We want to do this as transparent as possible as we don't want to confuse the great artists and other minds using our workflow.
You will find many possibilities to rely on when creating realtime graphic templates with After Effects using our Extension. When in doubt if anything works or not, we want to encourage you to just make a test composition and try to export it. If it works in the extensions preview player, it most certainly will work in every OGraf compliant playout solution.
Layer Types
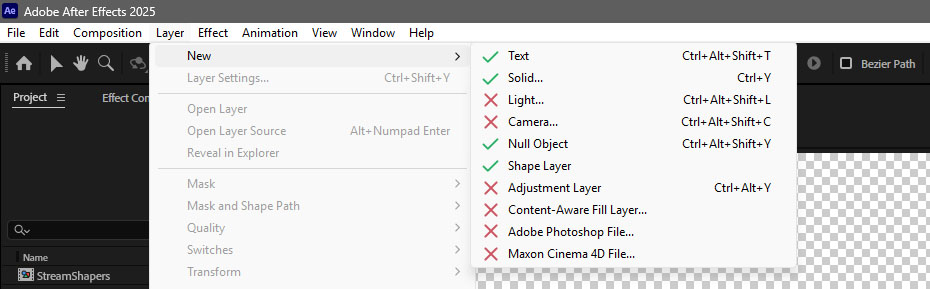
Shapelayers ✅
All Shapelayers are supoorted including:
- Rectangle ✅
- Rounded Rectangle ✅
- Ellipse ✅
- Polygon ✅
- Polystar ✅
- Shapes made with the Pen Tool ✅
3D Layers ✅
3D Layers are allowed, but once exported they will be rendered orthograffically, not in perspective. Have a look at the best-practices for a suggestion on how to handle simple 3D-Comps in the workflow. Accurate preview for 3D Layers
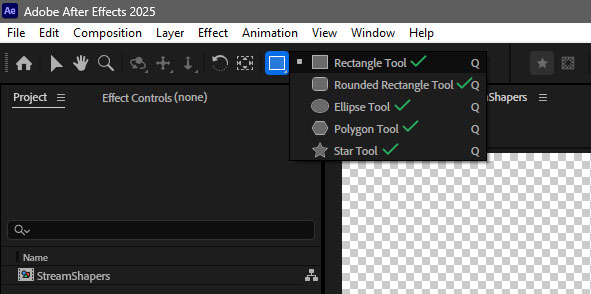
Camera Layers ❌
Camera Layers are not supported, we recommend deleting them before exporting your composition in using the OGraf Builder workflow. Export camera layers leads to unexpectedly positioned layers.
Null Objects ✅
Null Ojects are a convenient way to organize your composition and are fully supported.
Adjustment Layers ❌
Adjustment Layers are not supported.
Text Layers ✅
Of course you can use textlayers. As it is the main entry point for making parameters changeable in dynamic graphic templates you will use them often.
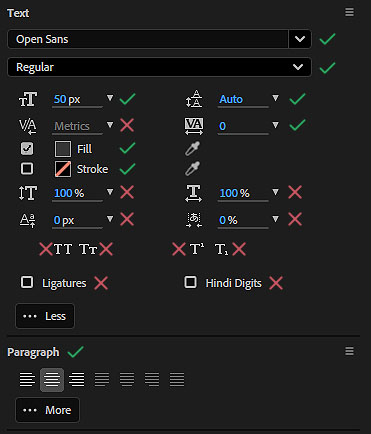
Choose your own font: The font file you have installed on your machine will automatically be rendered into your exported OGraf so your graphic template can be rendered using the desired font in production. The kerning method will be „Metrics“ after export, it does not matter if you selected „Optics“ or „Metrics“. If your kerning in the exported graphic template is different from how it is rendered in the After Effects Preview, this is the first thing to investigate.
The tracking can be used to increase the space between characters. A paragraph text will have linebreaks just as it does in After Effects. You can set your text to be left, middle or right aligned. The buttons for „Faux Bold“, „Faux Italic“, „All Caps“, „Small Caps“, „Superscript“, „Subscript“ will have no effect on your text after export.
Expressions
Using expressions within your templates is key to make logical connections and make them behave as you want it. Create Textboxes to grow with the amount of text inside: Use an expression! Make a rectangle grow to a desired size: Use an expression! Change a color for multiple objects at once: Use an expression!
Generally speaking, expressions are absolutely supported with the OGraf Builder workflow! That means you are absolutely able to reference the value from one attribute on another attribute. You are able to perform calculations using different values, compare values and define the output based on the comparison. You are able to use a variety of predefined functions as you are regularly used to when working with expressions in After Effects.
Some expressions and effects have proven themselves especially usefully and we would like to demonstrate them here Just look at the list and combine those functions as you wish in your projects. If you are not sure whether a particular expression is working, just try it! Here are some examples that work:
sourceRectAtTime() ✅
SourceRectAtTime is an expression in After Effects that gives you the width and height of a text layer, and it also works when you export your template with our StreamShapers Export Extension.
parseFloat() and parseInt() ✅
You can use many simple methods like parseFloat or parseInt if you want to convert a string from the Source Text to a float type. This is necessary to control the scale or position from a text value.
if statements ✅
Of course If statements can also be used within LottieFiles.
substring() and split() ✅
Just like other standart javascript functions, these functions to manipulate strings do work within LottieFiles that are used with Ferryman.
Math.max() ✅
A function to use whatever value is the greatest. With this expression for example: var biggerNumber = Math.max(value1, value2); You will get the bigger one of both values defined as the value for the variable 'biggerNumber'.
Chained Expressions 🔶
Whenever you have attribute A (a sourcetext for example), you can reference that attribute with an expression inside some other attribute B. If you then create an expression on attribute C and you refernce attribute B inside that expression, you will have created an expression chain. "C references B references A" this may lead to unexpected behavior and should be avoided if you encounter.
Limitations with Expressions
With the vast majority of expressions working, there are some limitations and things we need to exclude for the OGraf Builder workflow.
This list is not comprehensive, these are only examples of what won't work.
hexToRgb() ❌
The method "hexToRgb()" for example is not working.
chained expressions ❌
Be carefull when an expression on one layer determines a value based on another and this value is then needed by another expression. Instead of linking the result of the first expression, copy the expression and let that expression do the calculation itself. This way you make the calculation separately and won't have the issue of chained expressions.
- values that are only present in After Effects will not work outside of After Effects.
- most functions to manipulate styling of texts, e.g.: getStyleAt()
Effects
Most effects are not compatible with the „StreamShapers OGraf Builder“ workflow. Effects are perfect for compositing and visual effects, surely also for motion graphics whenever render times are not of particular interest. For real-time graphics however, use effects wisely and keep in mind to prerender otherwise calculation intensive effects beforehand. Here is a list of all the effects that are working:
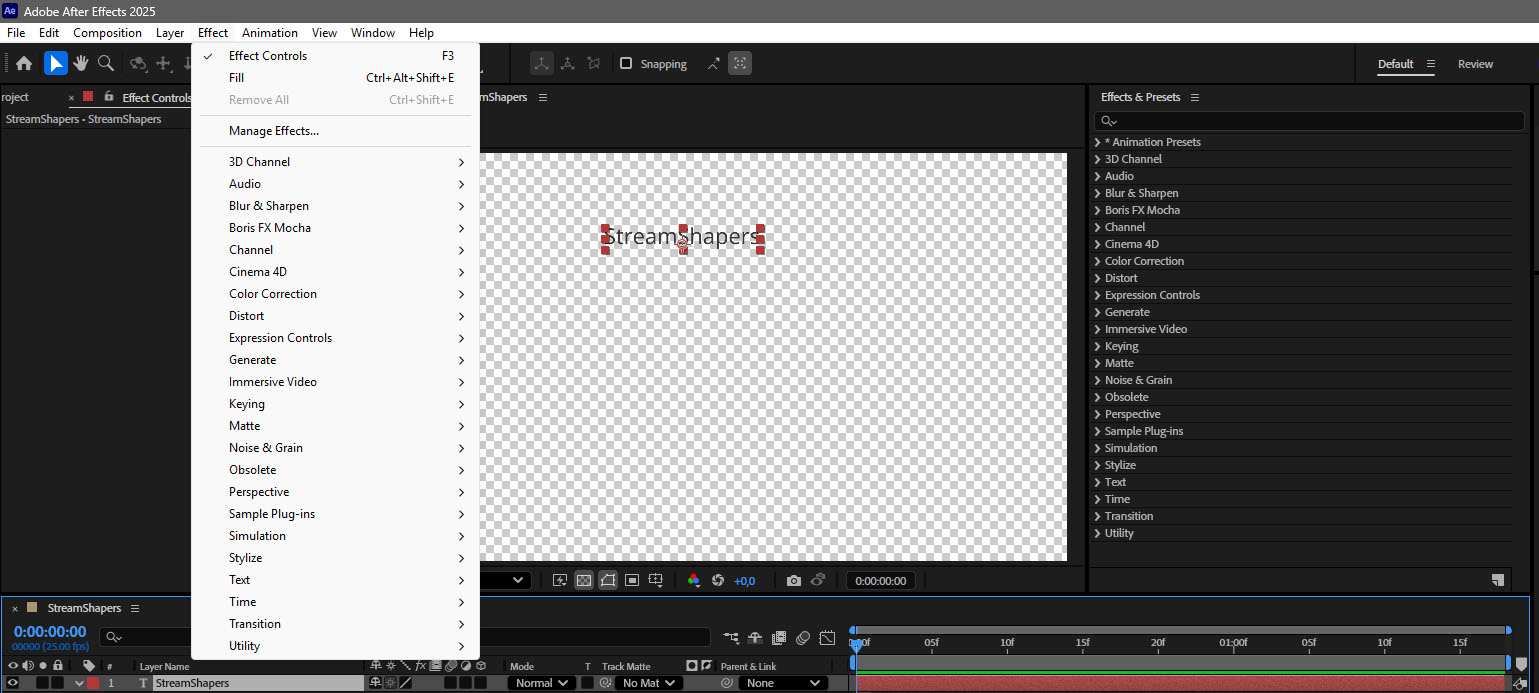
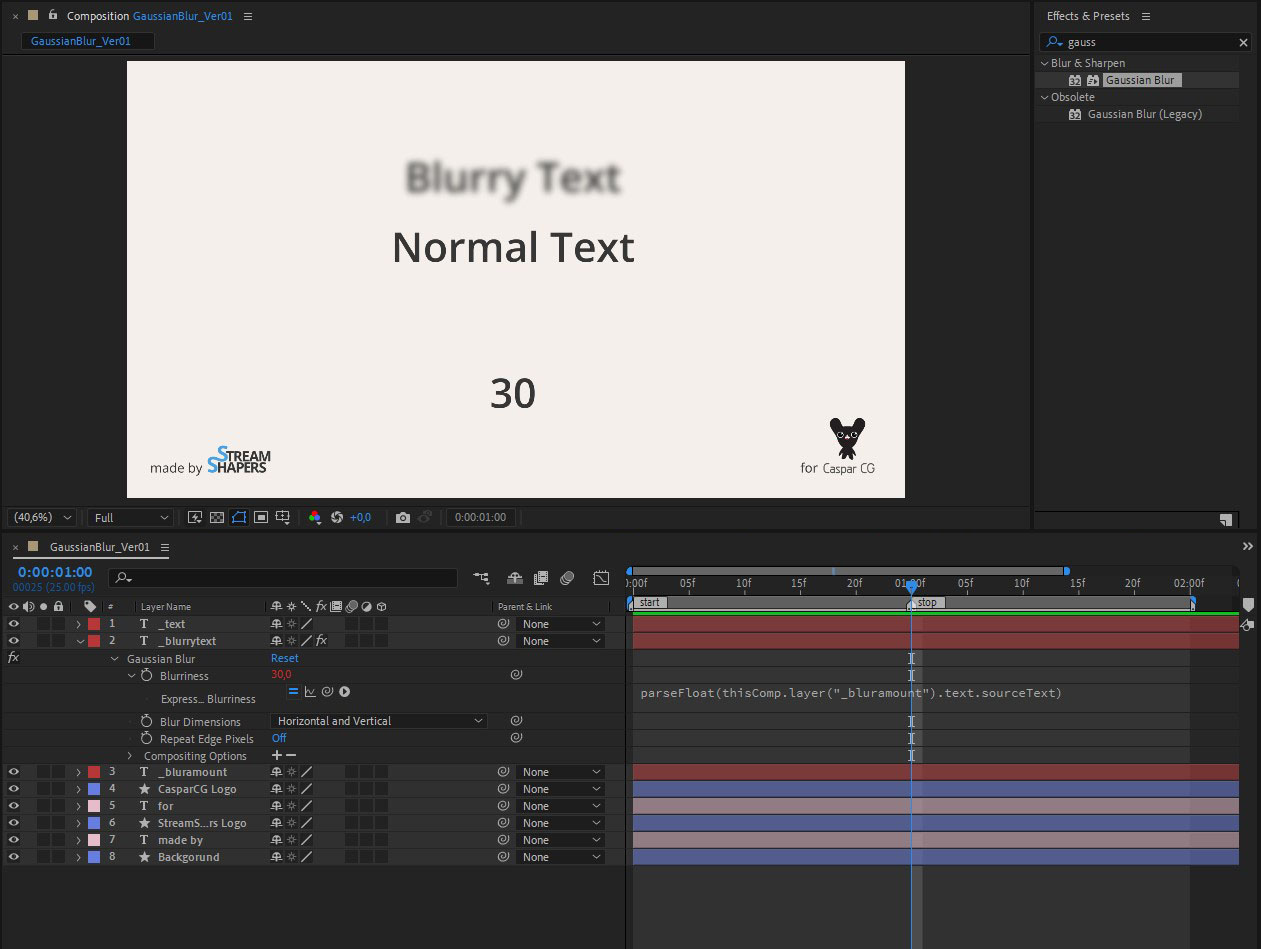
Gaussian Blur ✅
Gaussian Blur is working, you can use it to blur some layers in your template or to create a drop shadow like effect if you want. The Gaussian Blur effect applies a smooth, evenly distributed blur to a layer based on a Gaussian function. You can control the blur intensity via the Blurriness parameter. Gaussian blur works the same in the OGraf Builder workflow.
Slider Controls ✅
You can use Slider Controls as usual.
Tint ✅
The Tint effect in Adobe After Effects is used to remap the colors of an image by replacing darker and lighter tones with two specified colors. This allows you to create stylized looks, such as converting footage to monochrome or applying a color wash while preserving the original luminance. You can adjust parameters like “Map Black To,” “Map White To,” and “Amount to Tint” to control the color range and intensity of the effect.
Tritone ✅
The Tritone effect in Adobe After Effects maps the shadows, midtones, and highlights of an image to three different colors, allowing for more nuanced color grading than simple tinting. You can adjust the colors for shadows, midtones, and highlights individually, as well as fine-tune the blending between them using the “Blend With Original” parameter.
Levels ✅
The Levels effect in Adobe After Effects is used to adjust the brightness, contrast, and tonal range of an image by controlling its shadows, midtones, and highlights. It allows you to correct exposure issues or enhance contrast by remapping input and output values across individual color channels or the overall RGB image. You can fine-tune parameters such as “Input Black,” “Input White,” “Gamma,” and “Output Black/White” to precisely control how dark and light values are distributed.
Levels (individual Controls) ✅
The Levels (Individual Controls) effect in Adobe After Effects provides separate adjustment controls for each color channel, allowing more precise color correction than the standard Levels effect. This makes it possible to fix color casts or creatively shift the balance of reds, greens, and blues independently while maintaining overall image contrast. You can adjust parameters like “Input Black,” “Input White,” “Gamma,” and “Output Black/White” for each channel individually, as well as for the combined RGB image.
Transform ✅
The Transform effect in Adobe After Effects is used to control the anchor point, position, scale, skew, skew axis, rotation and opacity of a layer independently from its default transform properties. This allows for more flexible animation workflows without affecting the original layer settings.
Fill ✅
The Fill effect in Adobe After Effects is used to replace all colors in a layer with a single specified color while preserving the original transparency. This is useful for quickly recoloring shapes, text, or graphics without affecting their alpha channel or underlying structure. You can adjust parameters such as “Color” and “Opacity” to control the applied color and how strongly it mixes with the original image.
Stroke ✅
The Stroke effect in Adobe After Effects is used to create an outline along a mask or path, making it ideal for drawing animated lines or highlighting shapes. It allows you to generate effects such as handwriting animations or moving outlines that follow a defined path over time. You can adjust parameters like “Brush Size,” “Brush Hardness,” “Paint Style,” and animate the “End” value to control the appearance and progression of the stroke.
Dropshadow 🔶 (not great for texts)
The dropshadow effect may work, but create harsh cut off lines on the edges of textlayers. Instead of using the effect "Dropshadow", we recommend duplicating your textlayer, changing the fontcolor to the desired shadowcolor (usualy black), placing the duplicated layer underneath the original textlayer and applying a gaussian blur effect to this shadow layer. If your original text is a dynamic text element, do not forget to reference its "text.sourcetext" value in the shadows sourcetext attribute.
Every other effect is not supported ❌
Shape Layer Contents
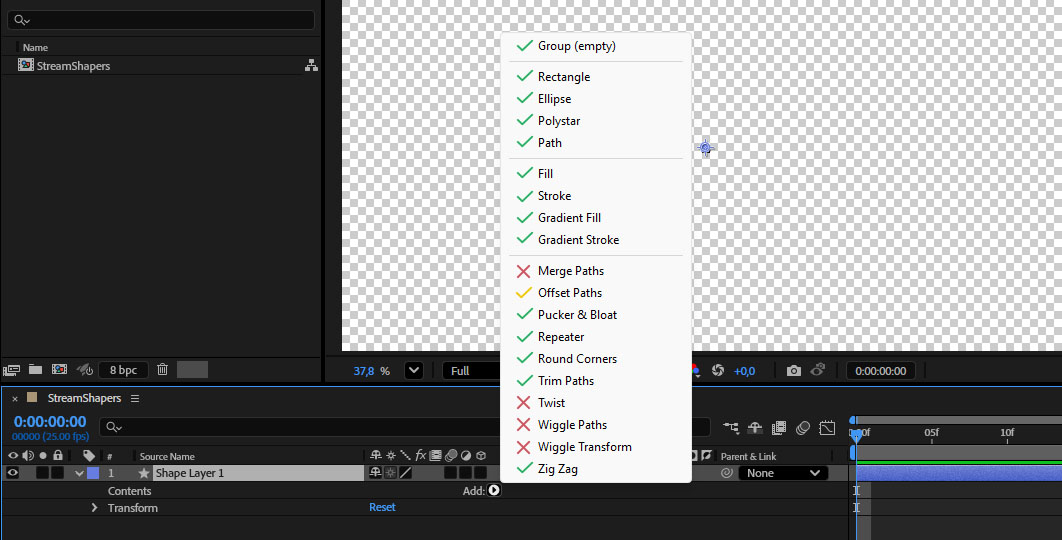
Solid ✅
Linear Gradient ✅
Gradients as Shape Layer contents are supported, have a look at our Best Practices on how to handle them correctly.
If your gradients is exported with black and white instead of colors:
- save your project before exporting
- make sure it is saved in a local directory, not on a remote fileserver or similar
Radial Gradient ✅
For Radial Gradients it is the same as for the linear gradients. They work the same.
Repeater ✅
Using one repeater on a shape layer is a great way to make many duplicates of simple shapes and works perfectly fine.
Make sure you do not use two repeaters on one shapelayer in line. You might be tempted to do so whenever you want to create a grid, but please do not. It will break your animation after export.
Trim-Paths ✅
The Trim Paths function in Adobe After Effects is used to animate the visible portion of vector paths, allowing you to reveal or hide shapes over time. This is commonly used for creating line animations, such as drawing logos, icons, or motion graphics elements along their paths. You can adjust parameters like “Start,” “End,” and “Offset” to control which parts of the path are visible and how the animation progresses.
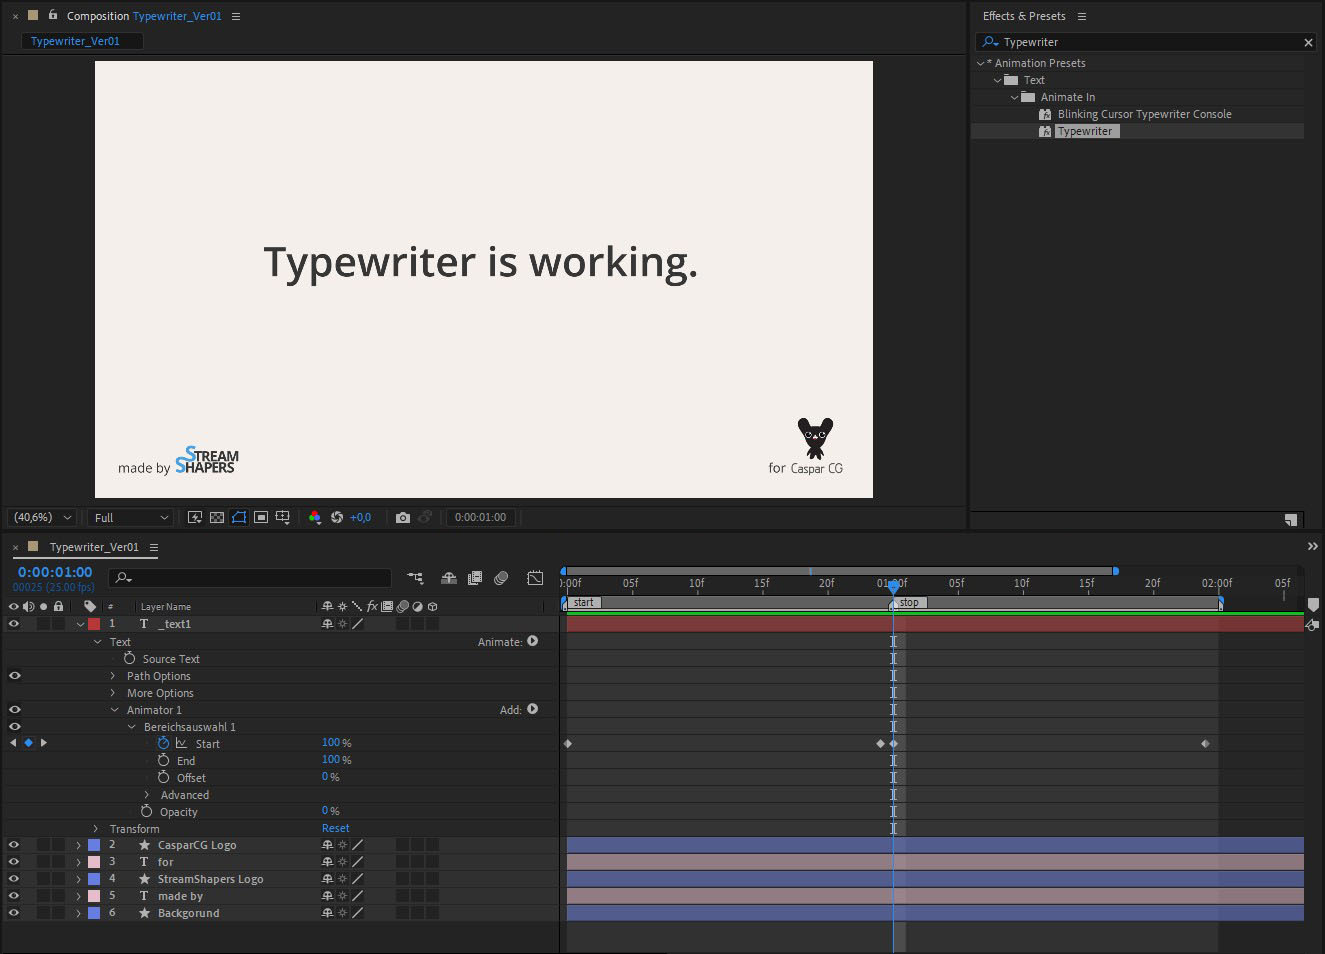
Typewriter Animation Preset ✅
You can use the animator called typewriter for your templates. Typewriter is most easily found in the Effects & Presets Panel. Controlled by Keyframes, it animates a text layer so that characters appear sequentially over time until the full input is shown. This creates the visual impression that the text is being typed out letter by letter, similar to a typewriter.
Text animations in general 🔶
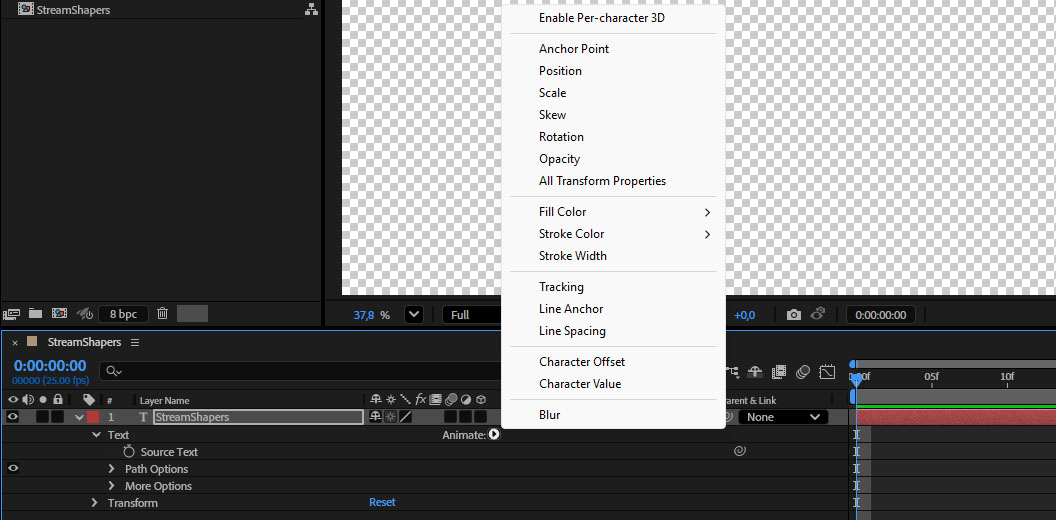 There are great ways to create fun textanimations in After Effects and you will find that some of these will also be exported.
Textrendering differs from After Effects to the exported text, so text and also the animations may look a bit different and we want you to be aware of that.
If you like, you can try to export something you have built and inspect the result in the Ferryman panel after you hit the 'Render' button.
There are great ways to create fun textanimations in After Effects and you will find that some of these will also be exported.
Textrendering differs from After Effects to the exported text, so text and also the animations may look a bit different and we want you to be aware of that.
If you like, you can try to export something you have built and inspect the result in the Ferryman panel after you hit the 'Render' button.
External files
Images ✅
Image files are supported. You can make them dynamic by naming the layer according to the naming convention with a leading underscore to have keep them changeable in your OGraf lateron. Keep in mind that it has an immense performance boost, when you reduce to the file size of your images to what is really neccessary for your template. Too high resolutions may lead to longer loading times and might even crash something, so always keep performance in mind.
Image-sequences ✅
You can use image-sequences in your animations, although they are not yet dynmically interchangeable as regular images would be (at least speaking of Ferryman 1.6.0). To use image-sequences use the regular image-sequences of After Effects.
- Open the importdialog as you would for importing an image
File -> Import -> File... - Choose one of your images from your sequence and check the checkbox for imagesequence import before clicking on import
- Your imagesequence should have been imported into your project window and you can drag it from there into your composition.
Videos ❌
Videofiles are currently not supported in this workflow. This does not mean that Videos are not possible with OGrafs. StreamShapers OGraf Builder just does not handle videos.
Masks ✅
You can use Layers as Track Matte as well as masks inside your layers. There are no limitations regarding masks, just use them as usual.
Precomps / Subcomps / Nested compositions ✅
Precomps will generally work. If you have created dynamic textlayers (textlayer, whose name starts with an underscore) inside a subcomp. These dynamic textlayers will also be recognised when you export the main composition.
Blending Modes
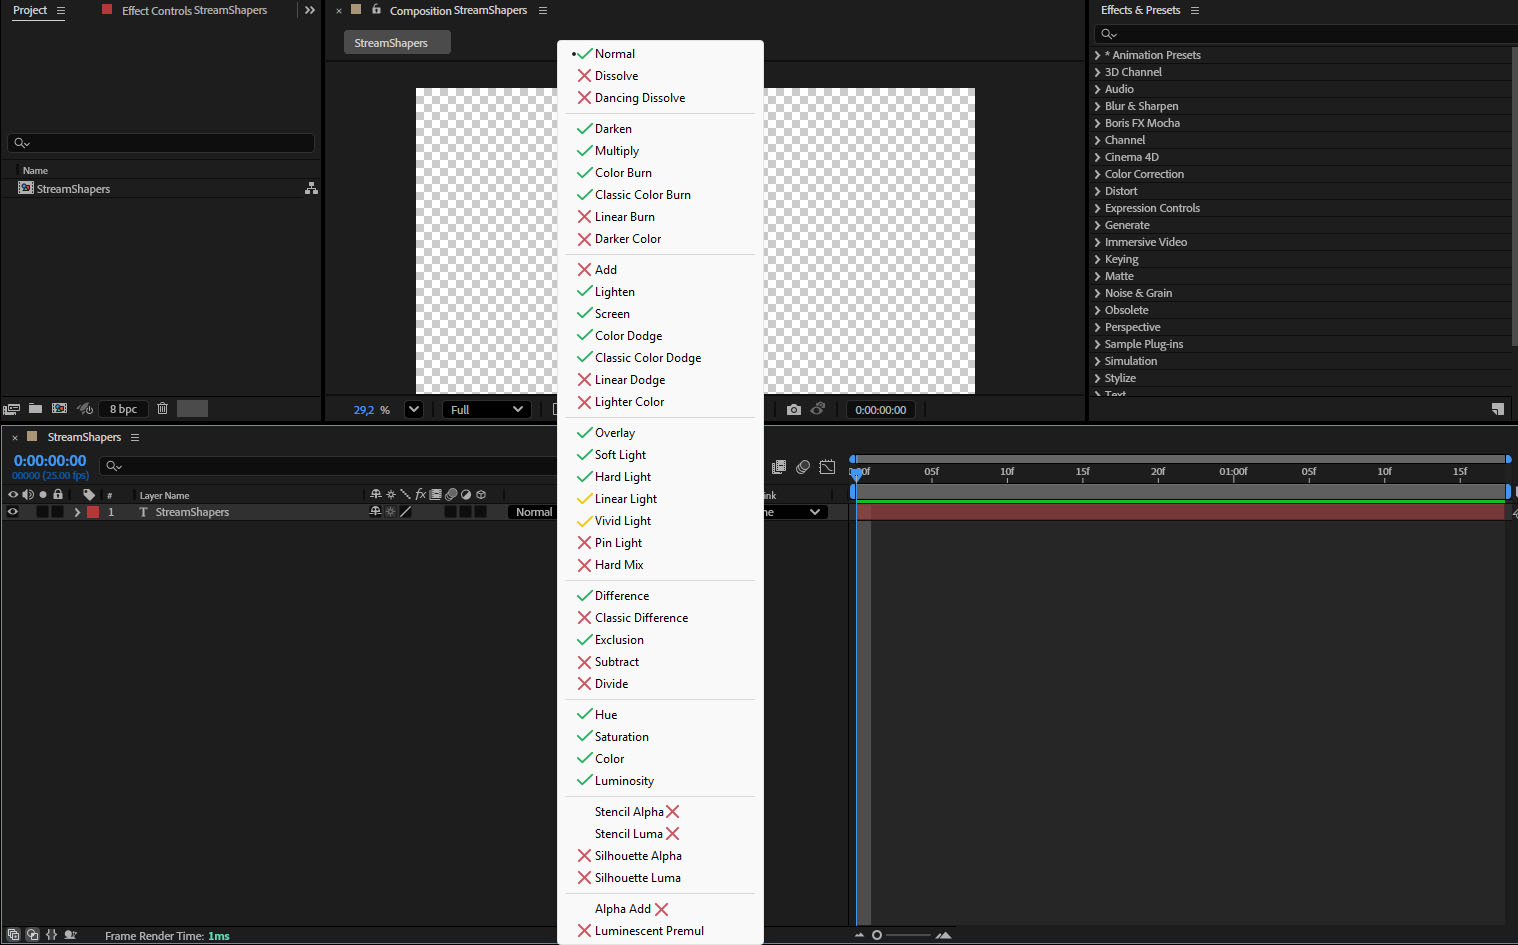
Normal ✅
Darken ✅
Multiply ✅
Lighten ✅
Screen ✅
Color Dodge ✅
Classic Color Dodge ✅
Overlay ✅
Soft Light ✅
Hard Light ✅
Linear Light 🔶
Kinda works, but is visually different from the way it looks in After Effects.
Vivid Light 🔶
Kinda works, but is visually different from the way it looks in After Effects.
Difference ✅
Exclusion ✅
Hue ✅
Saturation ✅
Color ✅
Luminosity ✅
Every other blending mode is not supported ❌
Layer Styles ❌
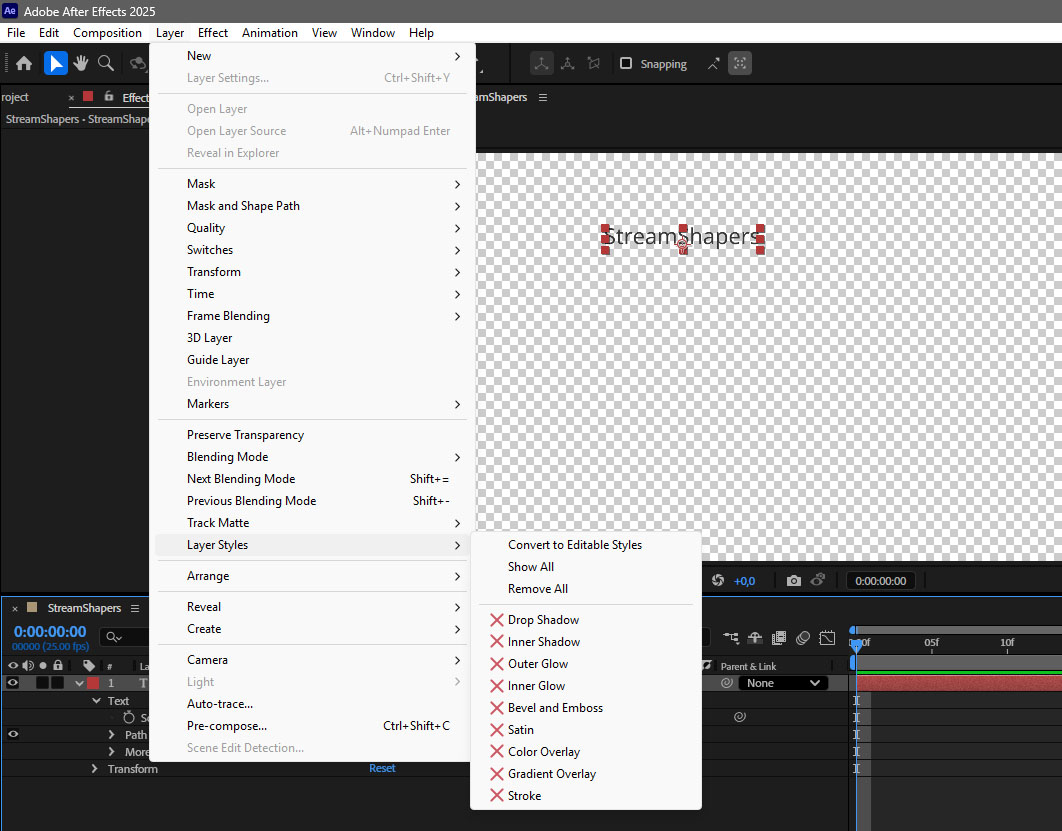
Layer Styles are not supported in the workflow and will be ignored in the export.
More information on what is supported
As you may notice, this page probably won't ever be comprehensive as support for new features may be added in the future. Also we haven't tried every effect, every expression, every way of doing things in After Effects within our Workflow. If you have tips, feel invited to get in touch via Discord or Email!
If you have a special use case in mind that you dont know how to recreate, we are always happy to hear about it! Other than that:
- Just try and see if it works!
Also have a look at our Ressources page for more information that may not be covered within our documentation.